Despicable Me Party: Games and Favors

3.30.2011

{ the games }

Minion Bowling 
The kids each got two turns to hit down all of the pins with a regular ball purchased at Wal*Mart.

I took 6, 2 Liter bottles, washed them out and glued the lid onto them.  Then spray the top with yellow Krylon Fusion spray paint, I bought mine at Wal*Mart (it sticks to plastic with no prep).  Then spray the bottom blue.


You can use painter's tape to make the line between blue and yellow sharp and precise, but quite frankly, I ran out of time and decided to not freak out about it.  Next download my printable goggles.  Print two sheets to get the 6 pairs needed.


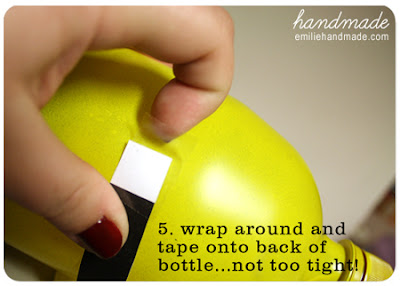
Next, follow these steps....


Pin the Goggles on the Minion.
I once again hit up my local print shop for this poster. 


I had it printed to 24" by 36" for around $3 in black and white. Color printing is very expensive, so the girls and I had a great time coloring the overalls blue and the bodies yellow before the party.  Crayons = free.  I'm just sayin'.  Click here to download...note: this is a very large file!   UPDATE: Somehow Mediafire managed to delete my file. I will try and make a new one to replace this, until then...sorry! *DON'T EMAIL ME AND ASK FOR THE FILE OR ASK WHEN THE FILE WILL BE AVAILABLE!*


Next download these goggles which fit perfectly onto the blank space on the poster.  Print onto card stock, cut around the goggles cleanly...i left the scraggly edges on there on purpose to make it easier to get a clean cut. Add a small roll of tape on back before guests arrive. Click here to download this file for printing.

Blindfold kids and let them go at it!   
Carnival UFO Game.
Print a copy of the carnival space ship by clicking here


Mount on foam core and cut out.  If you want to make it a larger target to hit, simply cut off the bottom stick before mounting to foam core and cut the foam core an inch or two around the spaceship.  I turned a party cup upside down and cut a slit in the bottom.  Then slid the space ship cut-out in and let the kids have at it...and the parents!
Nerf guns served as the perfect carnival blasters.  Children each got 4 rounds (that's how many ball;s are in the chamber of our nerf gun) to try and knock down the space ship.

{ the favors }

For the girls:
Tutus with Customized Tickets.


You can make your own tutus for inexpensive by following a tute like this one (via Make It and Love It).  But I decided to go easy and purchased tutus at the Dollar Store.  Then I designed these tickets to look just like the tickets to the Swan Lake ballet recital from the movie.  You can download my layered Photoshop File of the ticket for easy customizing by clicking here.  The font I used for the customizable type is Bebas (download for free here).  Attach with cotton twine and a mini safety pin.


For the boys:
Squid Launcher

Vector comes up with a number of great gun ideas during the course of the movie, but my favorite is the Squid Launcher. I made these graphic labels to add to any store bought water gun.


First download my graphic here.  Then purchase label/sticker paper in a  full size sheet.  You can buy the sticker paper at Wal*Mart or any big box office supply store.  Run it through your printer and then trim to fit your water gun.  I got these cool shaped water guns in packs of two at Dollar Tree.


 Download label sheets (with easy cut lines) by clicking here.


Whew!  And that does it!
I hope this inspires you to throw you're own Despicable Me party 
and have as much fun as we did!

See the other posts in this series...
 

i was late...way late.

here goes modesty out the window.

i am usually on top of things.
i snagged the demi moore "ghost" haircut in the same year the movie came out (with disastrous results). i blogged before everyone had a blog. i knew about jack johnson when he was still an unknown indie artist. you get the picture.

and yet...
i have never read The Pioneer Woman blog.
i heard about it years ago, but for some reason i never latched on.
until now.
know what changed my mind?
mac 'n cheese.


i made it last night for dinner (with some modifications)
and it was divine! heaven! sinful!

here is the ensuing recipe card for my files.
click picture below to enlarge, then right click and
choose "save" to have your very own copy in 4x6" format.
note: my changes to the recipe are on the card above.

i am late to the party...but i am a believer.
and there's only one thing left to say,
pioneer woman mac 'n cheese....you. complete. me.

Book Review: The Reluctant Entertainer

3.29.2011

The Reluctant Entertainer: Every Woman's Guide to Simple and Gracious Hospitality
by Sandy Coughlin
★ ★ ★ ★ ★

Wow! This book was completely amazing. So much better than I had anticipated. I was unfamiliar with the author's blog of the same name so I came to this book with fresh eyes and was not disappointed.

Not only was it inspiring, but it was also meaningful and really made you think about the concept of hospitality in a new way. I was expecting a book with set meal plans and decor ideas and, while there are a few of those in here, this book is much more a book about letting go of perfection and taking fear out of entertaining by breaking down the concepts, giving inspiration and empowering the reader to move forward with a new definition of what makes a good hostess.

Recommended to all for its wonderful readability and no pressure guidance to become a person of hospitality, not just a stressed-out person throwing dinner parties.

Available on Amazon.com here.

busy busy busy

3.27.2011

i know, i have seriously been slacking on the ol' craft blog lately.
mostly because crafting has taken an unexpected backseat to...well...life.
{sigh}

2011 has been a ca-raze-ay year so far.
and my days are currently filled with just making it through alive.
wow, that sounded overly dramatic.
it's not all bad, just so busy it's insane!

do you have seasons of life like that?
i feel downright proud of myself if ella gets to school fully clothed and with a backpack.

however, i do have a thing or two to report of a crafty nature...

1. i finished this book.
amazing people, amazing.
check it out from your local library...like now.

i have planned twice monthly dinner parties from now until summer.
i will be reporting after each party with tips, what worked, what didn't work and maybe a freebie or two for your own dinner party!

2. i have been hitting the thrift stores pretty hard and getting great finds lately. i will definitely be sharing fun finds and fabulous makeovers.

3. i am currently in the process of turning our living room from a "college dorm/women's penitentiary/toddler naughty zone" into a fun, cozy and fresh space that i can finally be proud of. i painted two walls 2 weeks ago. stepped back and decided i wasn't being bold enough. last week i bought new paint and will be repainting soon.

4. i am scouring the internet for white tablecloths to cover our "college dorm/women's penitentiary/toddler naughty zone" scuffed table for our forthcoming dinner guests.

5. i am cleaning out my craft room to make way for baby bianca. also getting all of my best scrapbooking items ready to be artfully arranged in a basket and donated to our local women's organization charity auction.

so, my friends, i want to say thank you for reading my blog.
thank you for sticking with me during my recent abandonment of said blog.
thanks for leaving comments that put a smile on my face!

seriously, you rock.

it happens...

3.25.2011

what happens?
life getting in the way of crafting,
and posting on one's craft blog.

almost 10 days with no post?
sorry.
don't give up on me yet!
i do have something to post about today.

i am currently reading...

and it's changing the way i feel about
entertaining guests in our home.

we have made a new goal to host a dinner party
once each month.
plans, free printables and other fun ideas
are running through my head.
monthly details to follow.

will you be our first guests
???

Recipe: Irish Soda Bread

3.17.2011


Happy St. Patrick's Day!

Here in the Ahern household, we take this holiday pretty seriously. Check out our wicked-cool Coat of Arms pictured left.  You don't want to mess with a Wild Heron...or three!

But I'm pretty sure you may be more interested in this..my Irish Soda Bread Recipe. It's quick, easy and delicious! If you're not a bread maker don't worry! There's no yeast and it's goof proof!

Make it tonight! Click here for the printable 4x6" recipe card pictured below.  It's the first in a series of printable recipe cards from my kitchen to yours...per your request

Simply open the pdf, print and trim to 4x6".  Enjoy!


Ahern Irish Soda Bread Yields 1 loaf

3 cups all-purpose flour
1 cup cake flour or substitute with ¾ c. flour + 2 T. cornstarch
2 T. granulated sugar
1 1/2 teaspoons baking soda
1 1/2 teaspoons cream of tartar
1 1/2 teaspoons table salt
3 T. unsalted butter (2 tablespoons softened + 1 tablespoon melted)
1 1/2 cups buttermilk or substitute with 1½ c. milk + 1½ T. lemon juice or vinegar


- Preheat oven to 400 degrees.
- Whisk flour, sugar, baking soda, cream of tartar and salt in large bowl.
- Work softened butter into dry ingredients with fork or fingertips until texture resembles coarse crumbs.
- Add buttermilk and stir with a fork just until dough begins to come together. Turn out onto flour-coated work surface.
- Knead until dough just becomes cohesive and bumpy (do not knead until dough is smooth, or bread will be tough.)
- Pat dough into a round about 6 in in diameter and 2 in high and place on greased baking sheet and cut a cross in the top.
- Bake at 400* 20-30 mintues or until golden brown and a skewer inserted into center of loaf comes out clean.
- Brush top with melted butter.

Note: this bread is always best warm. When it cools it loses some of its magic so make it right in time for dinner!

Despicable Me Party: Food & Treats

3.16.2011

So, the food for this party was so fun to brainstorm!

I always host parties starting at 1:00 pm on a Saturday because of my overwhelming desire to avoid having to serve guests an actual meal. However, if you did decide to serve a meal I would highly suggest Stuffed Crust Pizza.

It's such a funny part of the movie and you could either order it or grab a frozen variety (DiGiorno makes one) from the store. Ooooohhhh....stuffed crust!

I also always opt for ice water at parties, but if you're brave and/or don't have light carpeting you could always serve Juice Boxes like the one Edith was drinking when she got shut in the spike-box.

So, on to my choices...

Candy in a dog bowl - When Gru first adopts the girls he leads them into the kitchen where he has a red dog bowl filled with candy for their food source.
I snagged this perfect red dog bowl at the dollar store (Dollar Tree to be exact) and filled it with a bag of mixed candy. The kids loved it...obviously.
Coconutties - So, I considered baking some coconut cookies, but as the days fast approached and my to-do list grew I decided to opt out of the Super Mommy Hall of Fame and grabbed a bag of macaroons from the store for under $2. Easy peesy. Just to help the kids make the connection I made this small sign, printed it and placed it in front of the cookies. Download my Coconutties place card for free by clicking here.

Minion Cupcakes - SO cute and easy!

- pre-baked cupcakes, cooled
- one Twinkie for each two cupcakes you'll be making
- one can regular vanilla frosting
- piping bag and round piping tip
- 10-15 packages of Smarties candy (white seperated and set aside)
- black food coloring paste
- one container dark brown Jimmies

- Cut each Twinkie into two equal pieces.
- Spread white frosting onto each cupcake.
- Split remaining frosting into 2 separate bowls.
- Tinted one batch black and another light grey.
- Pipe a black line 1 inch from the rounded top of the Twinkie. This becomes the goggle straps.
- Stick on the two white Smarties while the black frosting line is still wet. 
- Use the same black frosting to make pupils on two white Smarties.
- Add the mouth with the same black frosting. 


- Use the lighter grey icing to pipe a thin line around the goggle edges
- Stick a few dark brown jimmies in the top for the hair. 

The cupcake frosting is so rough because I planned on putting a circle of fondant on top that the Twinkie Minions would appear to be bursting forth from...until I realized how stressed I was...then I skipped it.  No guilt!

Note: I made these just one hour before party time and the Twinkies (which are known to be literally unable to spoil) get really dried out and gross when exposed to the air for even a short time. Not that any of the 4-year-olds complained.

See the other posts in this series...


Despicable Me Party: Invites & Decorations

3.15.2011

{ The Invitations }

Here are the invites we sent out for the party...
I took the Gru silhouette from the movie poster and created this invite using Photoshop.  The Despicable Me font is actually called Las Vegas Jackpot and can be downloaded here.

These are 5x7" and I printed them on our home printer
(that's why there is minimal orange) onto cardstock.
Download a blank copy which you can put your white text onto.
Click on image to enlarge, then right click and choose "Save".


{ the decorations }


Table Runner - I first laid down a plain white table cloth.  I snagged this black and grey striped fabric from a local store and used it as a table runner.  Throughout the movie Gru wears a scarf exactly like this (as seen below) and it added a nice depth to the table...we are celebrating villians here!


Villian Logo Banner - First up was a banner for above our party table.  I used Photoshop to make these icons representing Gru's logo and Vector's logo (as seen below).  Print them out, cut out circles and adhere to string for an instant banner!  Click here to download printable pdf file.


Moon Poster - Since the moon is a central focus of the movie I got a picture of the moon and had it printed to 36x36" at a local copy store (for around $4) and hung it on the wall.  I love how it turned out!  Click here to download my file and take it on a jump drive or burned onto a CD to your local copy center to print!


Minion Balloons - I bought standard yellow helium balloons and used a large tipped permanent marker to draw goggles and eyes on them and placed them around different areas where the party would take place.  In the hubbub of party time I failed to snap a picture of these, but I think you get the idea!  Warning: Don't let your kids touch these balloons after you draw on them, the marker wipes off onto their skin.

See the other posts in this series...